> ## Documentation Index
> Fetch the complete documentation index at: https://docs.xpaycheckout.com/llms.txt
> Use this file to discover all available pages before exploring further.
# Architecture
> Below is the Architecture of your xPay integration for one time payments.
 ### xPay Payment Flow Architecture
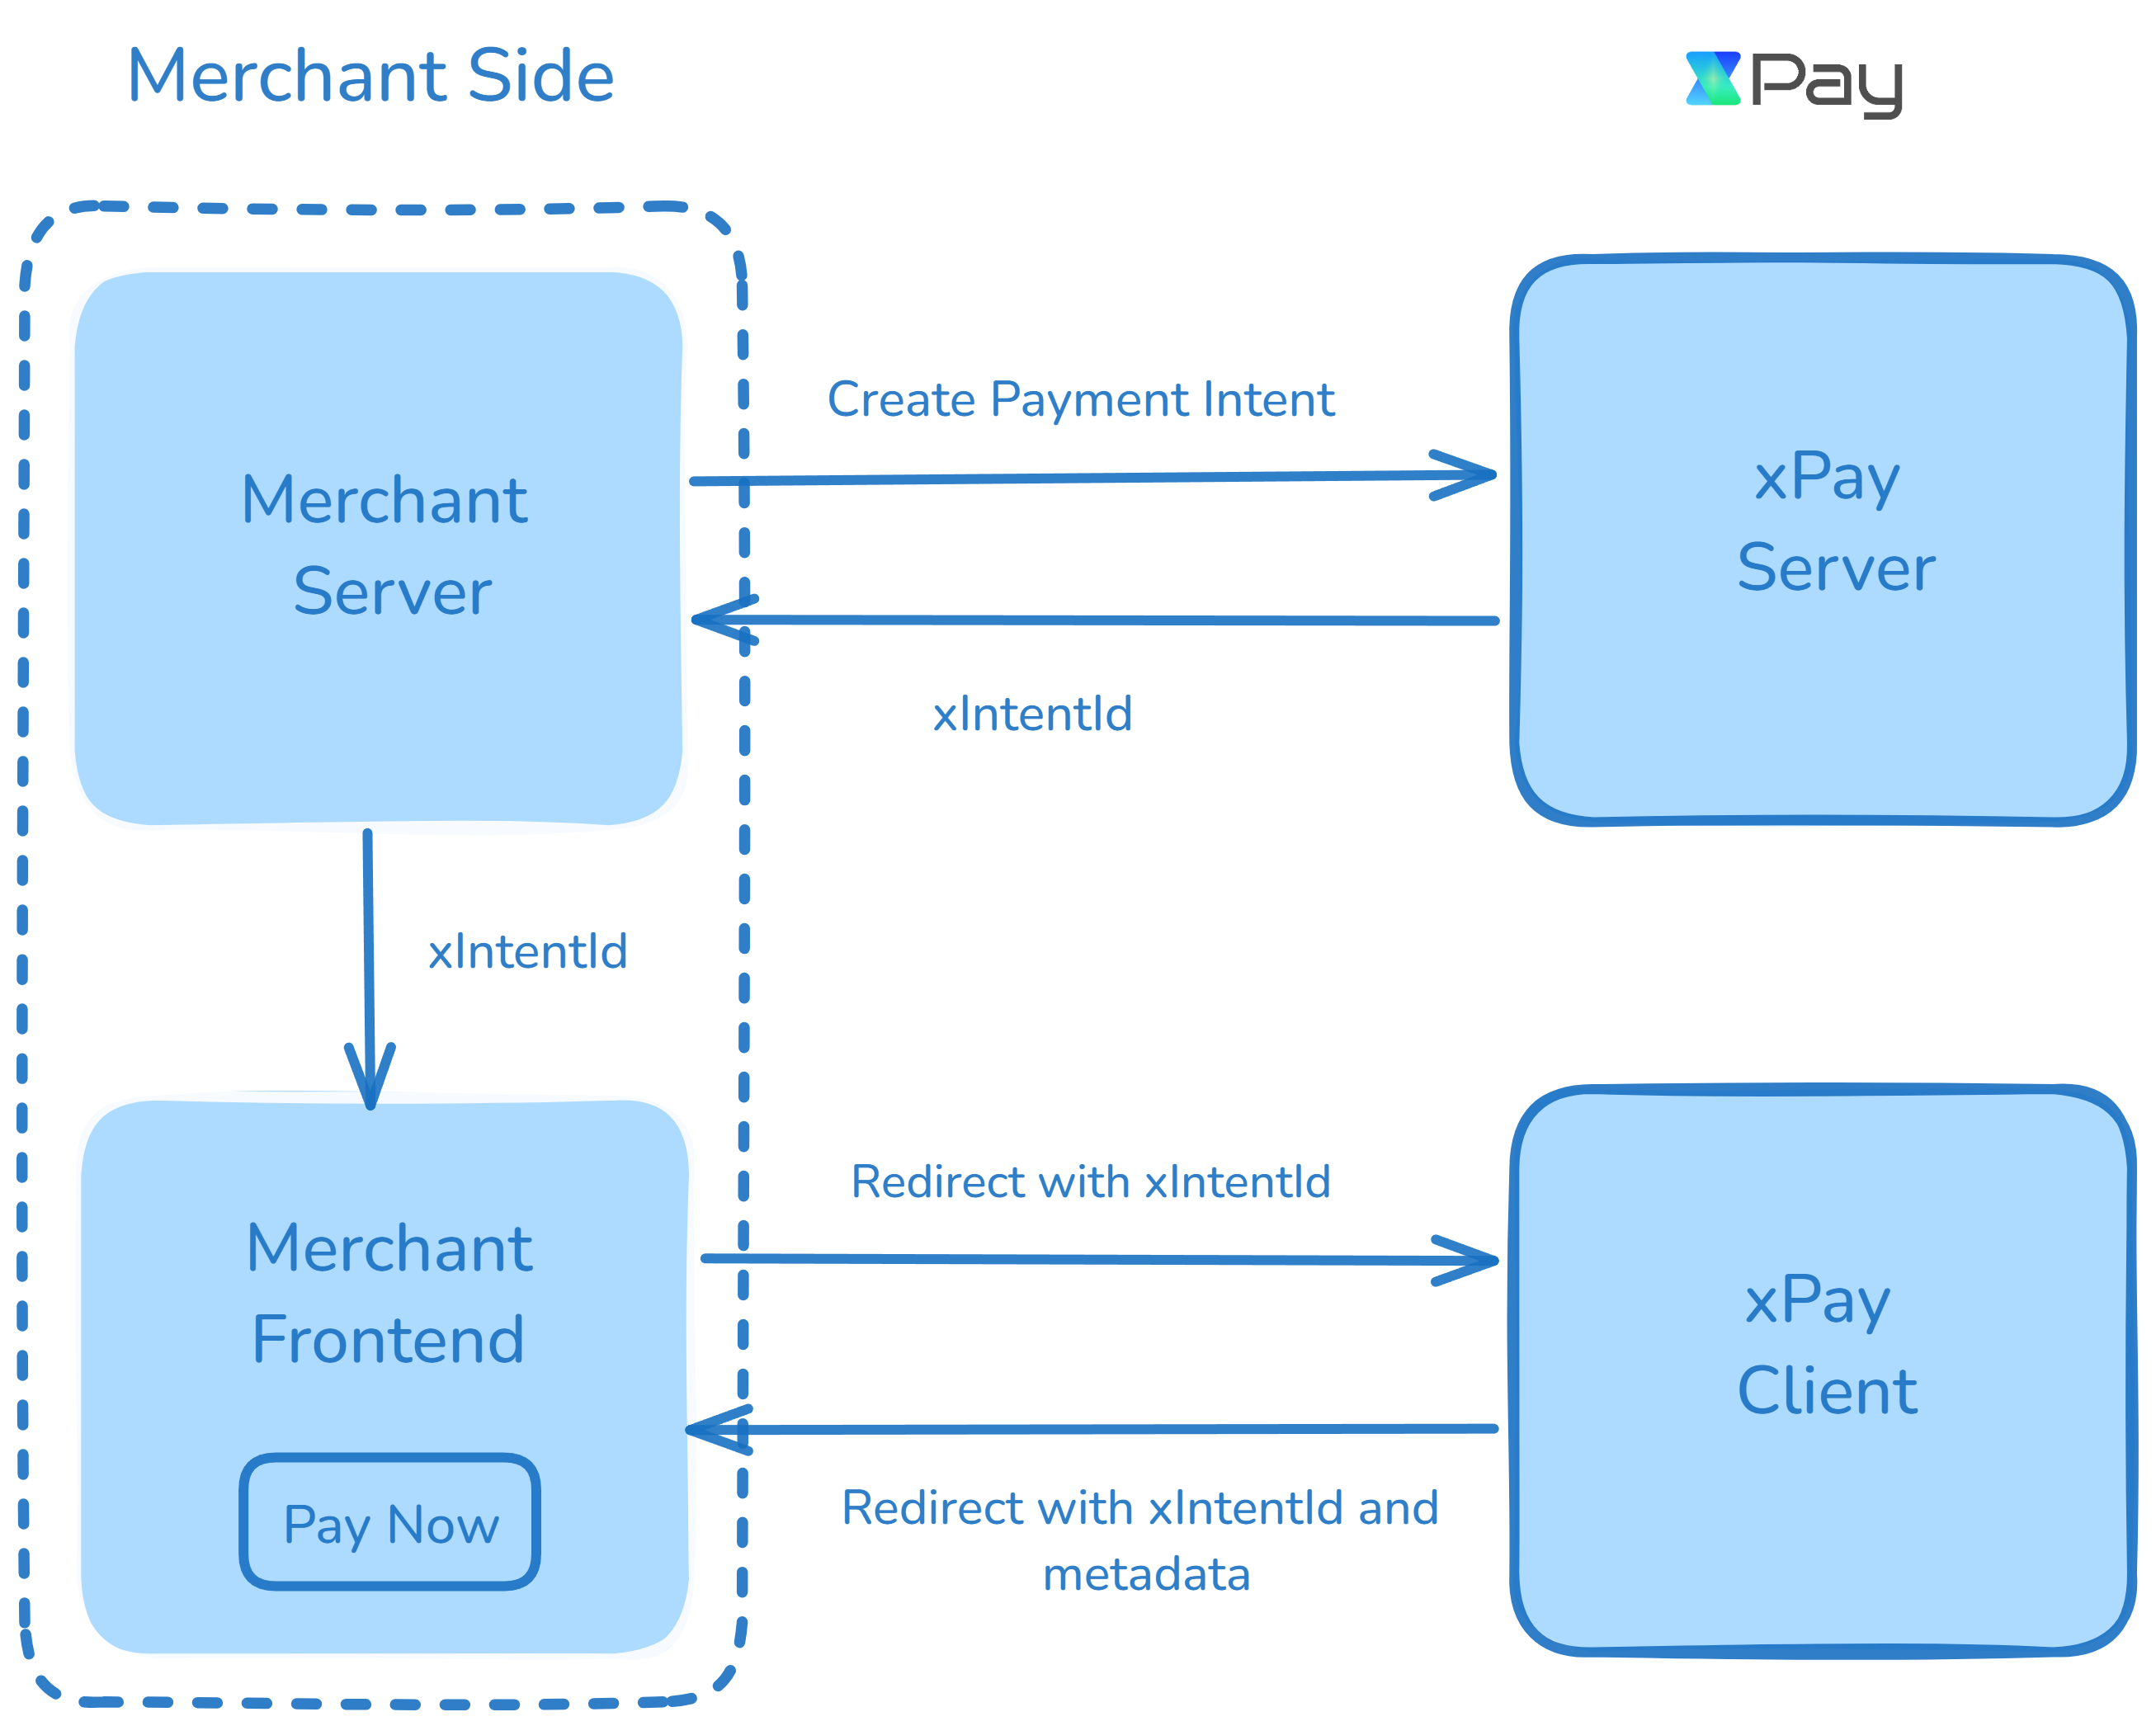
This diagram illustrates the integration flow for processing payments through xPay. The architecture involves three key components: the **Merchant Server**, **Merchant Frontend**, and **xPay’s Server and Client systems**. Here's a step-by-step breakdown of the payment process:
The payment process begins when the Merchant Server initiates a request to
the xPay Server to create a payment intent. This intent encapsulates the
necessary details for the payment, such as the amount, currency, and other
transaction metadata. See all the details in [xPay APIs](/developer-resources/endpoints/payments/create-intent).
Once the payment intent is successfully created, the xPay Server responds to
the Merchant Server with a unique identifier for the payment, known as the
`xIntentId`. This identifier will be used to track the payment throughout the
process.
The Merchant Server forwards the `fwdUrl` to the Merchant Frontend, which
is responsible for managing the user interface that initiates the payment.
Upon user interaction (e.g., clicking `Pay Now`), the Merchant Frontend
redirects the customer to the xPay Client by using the `fwdUrl`. This
redirection allows xPay to handle the actual payment process, presenting the
user with various payment options and methods. See all the methods here [Payment Methods](/get-started/payment-methods-supported)
After the payment is processed, the xPay Client redirects the user back to
the Merchant Frontend, providing the **xIntentId** and any relevant
metadata.
Now, you can check the payment status by contacting your server, which will communicate with xPay's server to verify the status using the **xIntentId**.
### Key Components
* **Merchant Server**: Handles backend operations like creating payment intents and processing the xIntentId received from xPay.
* **Merchant Frontend**: Manages the user interface, enabling users to initiate payments and receive feedback on the payment status.
* **xPay Server**: Responsible for generating the payment intent and returning the xIntentId to the Merchant Server.
* **xPay Client**: Manages the user’s payment journey, providing them with payment options and returning transaction metadata after payment processing.
This flow ensures a smooth, secure, and efficient integration for handling payments via xPay, with minimal friction on the user’s end. Each step is designed to maintain clarity, streamline transaction handling, and facilitate a seamless experience for both developers and users.
### xPay Payment Flow Architecture
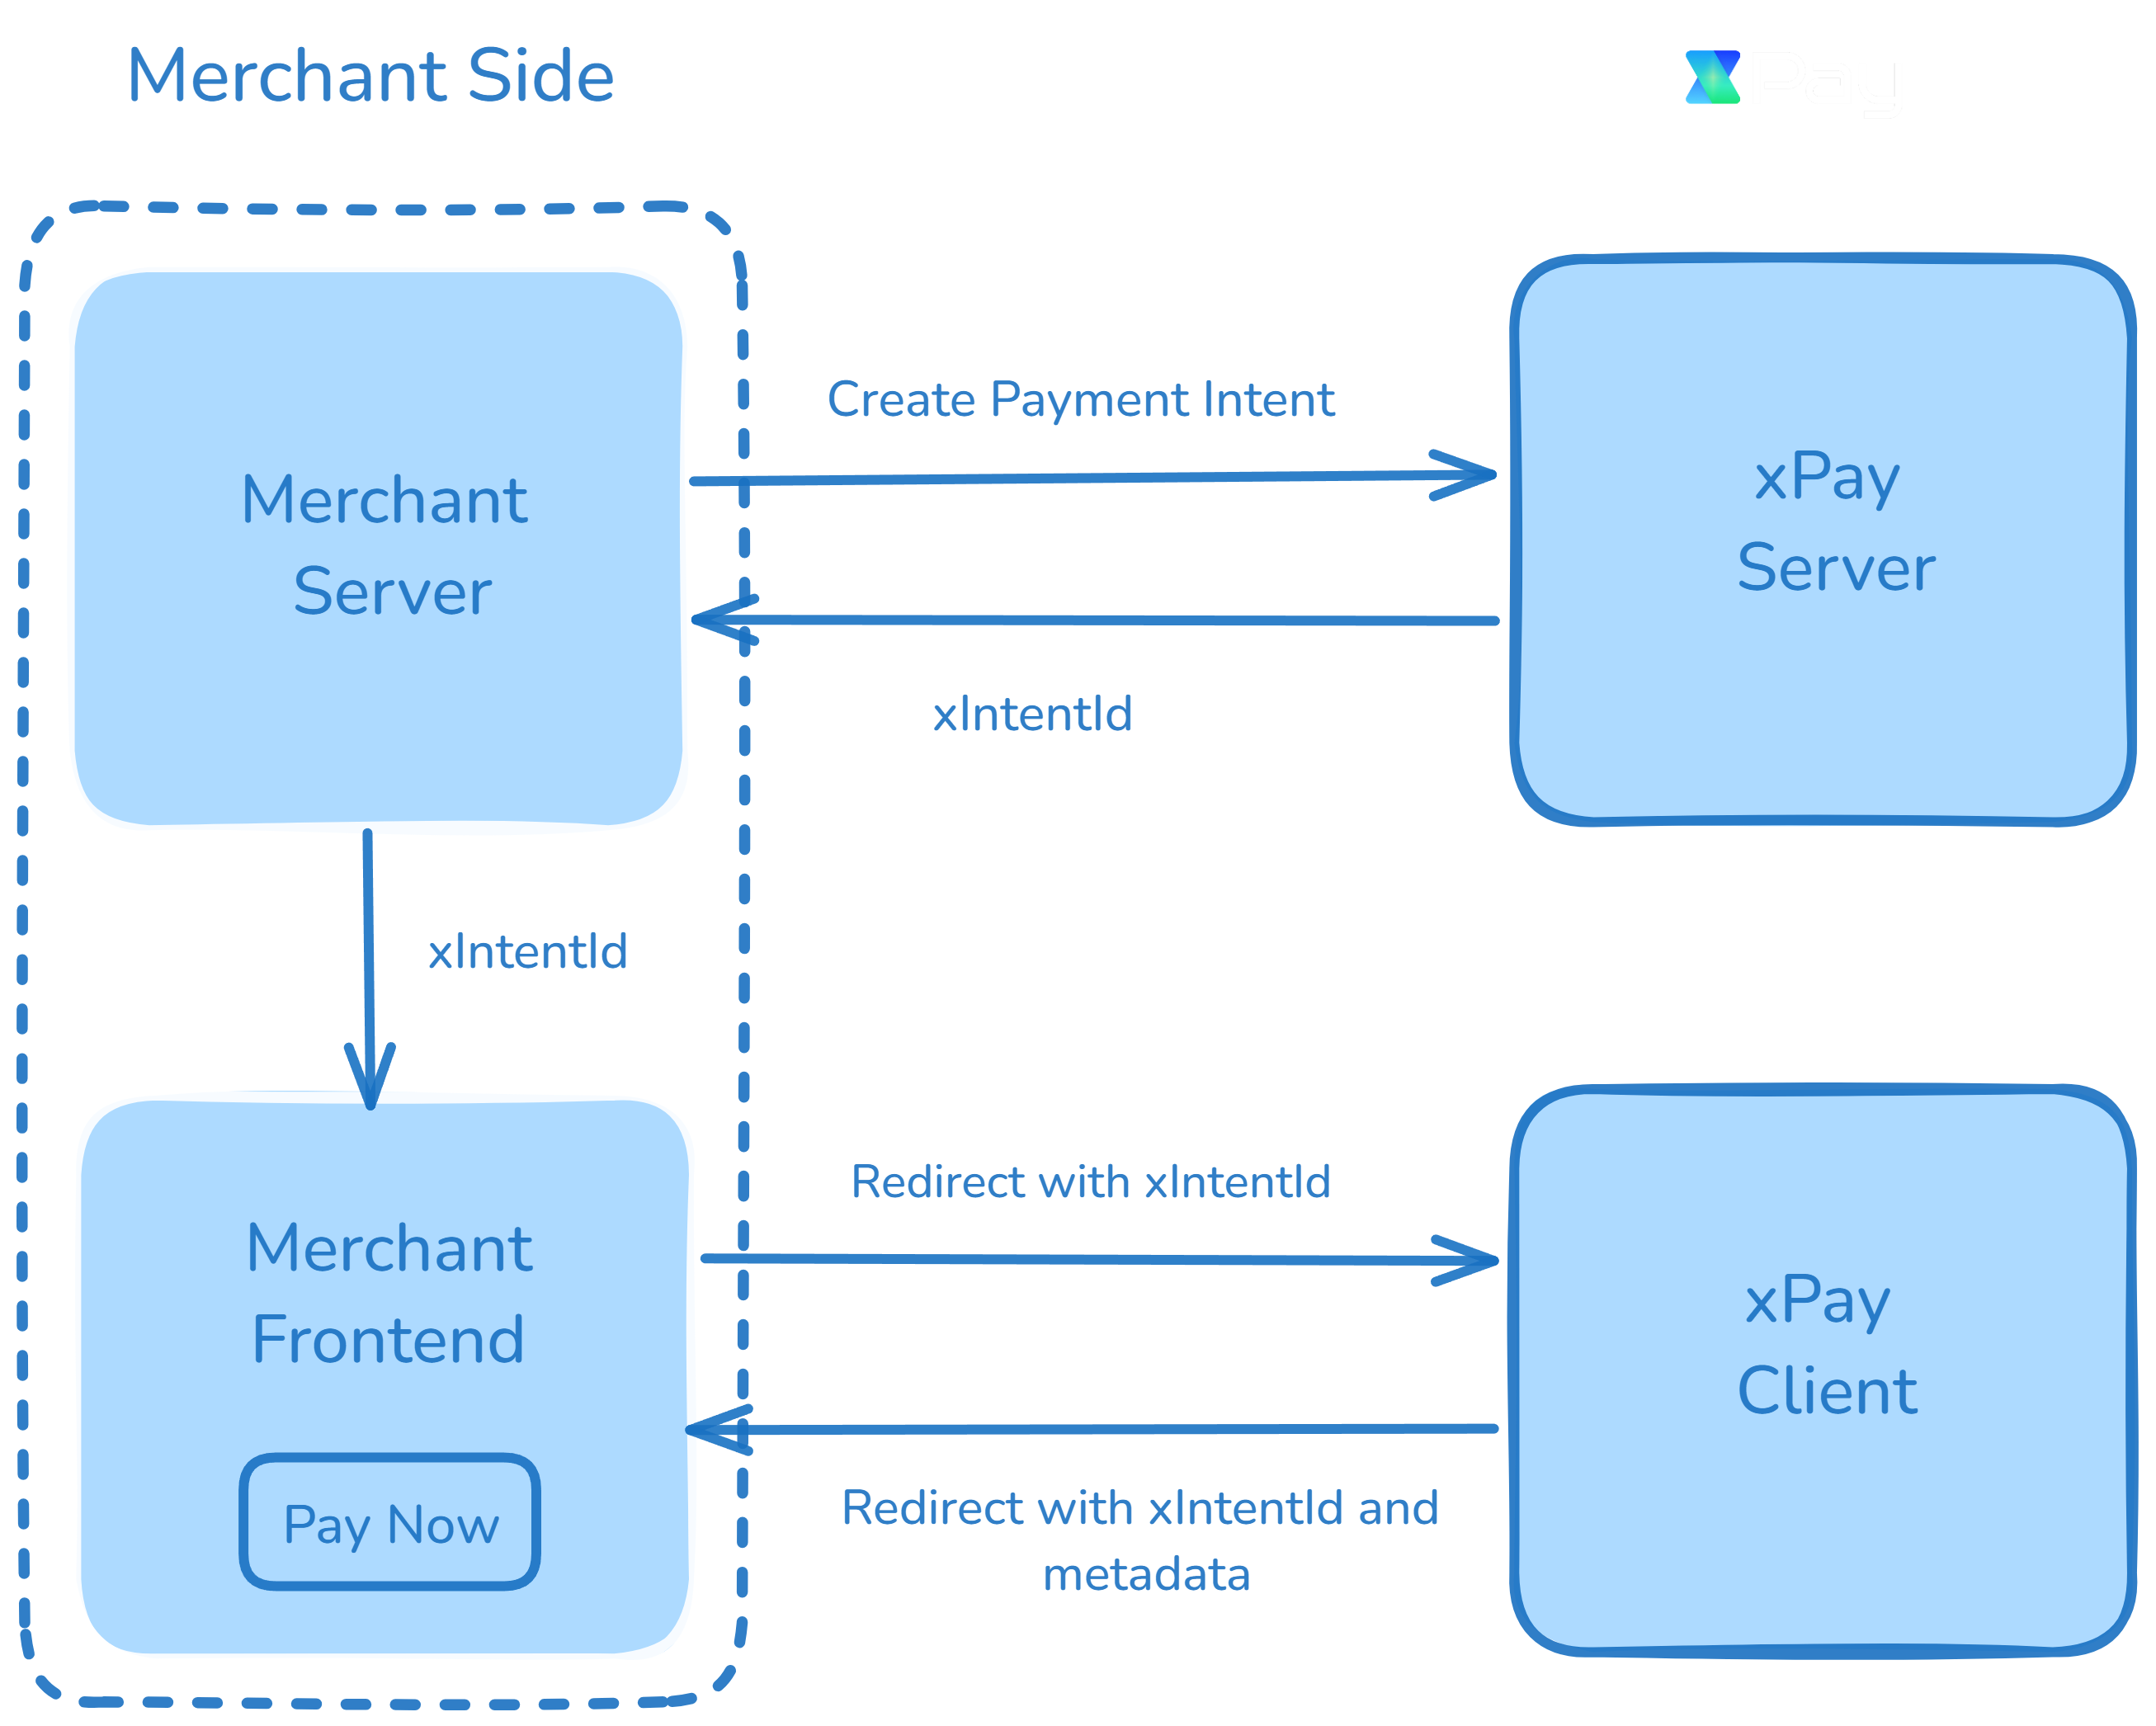
This diagram illustrates the integration flow for processing payments through xPay. The architecture involves three key components: the **Merchant Server**, **Merchant Frontend**, and **xPay’s Server and Client systems**. Here's a step-by-step breakdown of the payment process:
The payment process begins when the Merchant Server initiates a request to
the xPay Server to create a payment intent. This intent encapsulates the
necessary details for the payment, such as the amount, currency, and other
transaction metadata. See all the details in [xPay APIs](/developer-resources/endpoints/payments/create-intent).
Once the payment intent is successfully created, the xPay Server responds to
the Merchant Server with a unique identifier for the payment, known as the
`xIntentId`. This identifier will be used to track the payment throughout the
process.
The Merchant Server forwards the `fwdUrl` to the Merchant Frontend, which
is responsible for managing the user interface that initiates the payment.
Upon user interaction (e.g., clicking `Pay Now`), the Merchant Frontend
redirects the customer to the xPay Client by using the `fwdUrl`. This
redirection allows xPay to handle the actual payment process, presenting the
user with various payment options and methods. See all the methods here [Payment Methods](/get-started/payment-methods-supported)
After the payment is processed, the xPay Client redirects the user back to
the Merchant Frontend, providing the **xIntentId** and any relevant
metadata.
Now, you can check the payment status by contacting your server, which will communicate with xPay's server to verify the status using the **xIntentId**.
### Key Components
* **Merchant Server**: Handles backend operations like creating payment intents and processing the xIntentId received from xPay.
* **Merchant Frontend**: Manages the user interface, enabling users to initiate payments and receive feedback on the payment status.
* **xPay Server**: Responsible for generating the payment intent and returning the xIntentId to the Merchant Server.
* **xPay Client**: Manages the user’s payment journey, providing them with payment options and returning transaction metadata after payment processing.
This flow ensures a smooth, secure, and efficient integration for handling payments via xPay, with minimal friction on the user’s end. Each step is designed to maintain clarity, streamline transaction handling, and facilitate a seamless experience for both developers and users.